Terraform, AWS, and other personal progress
Notes step by step:
04/15/20
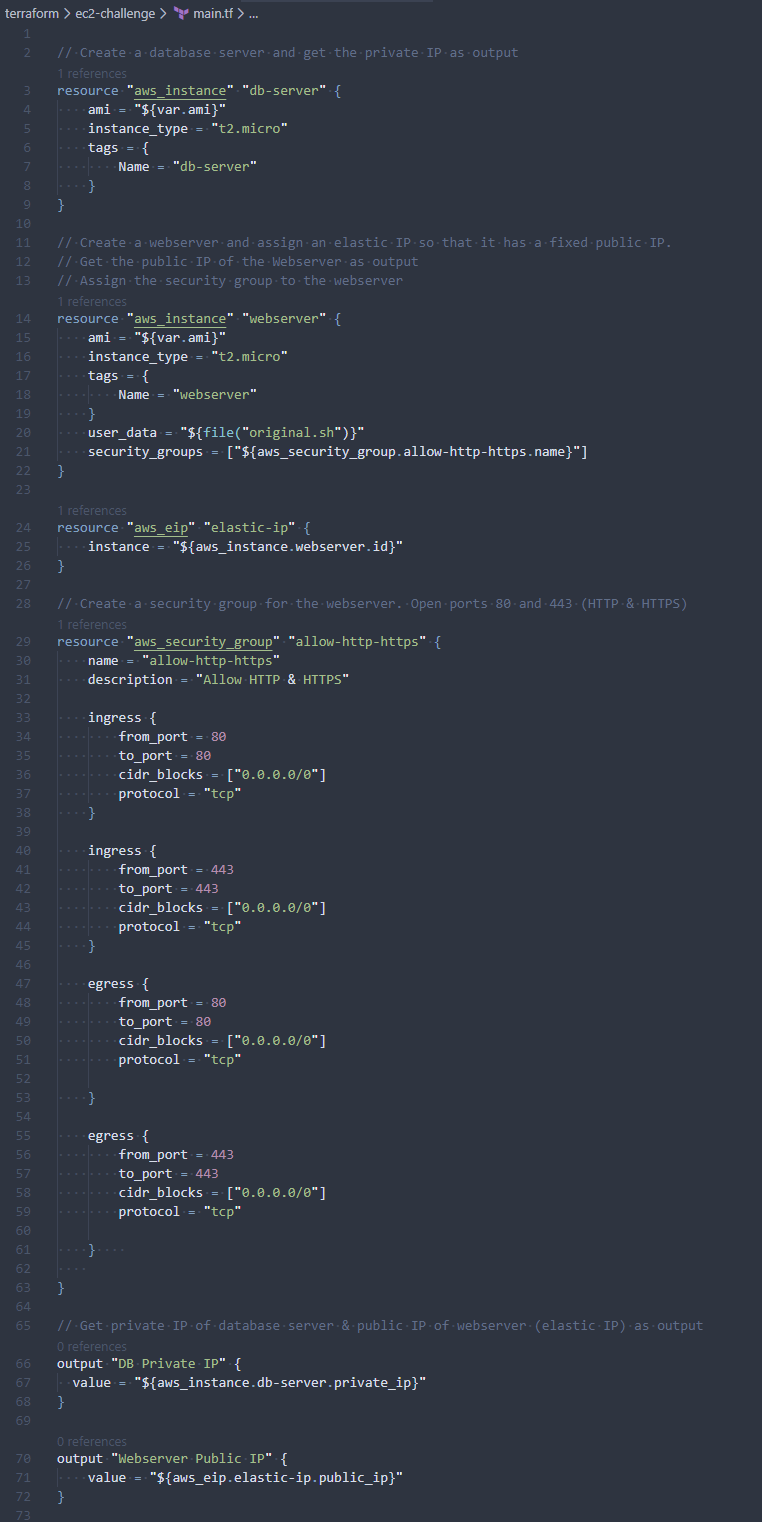
1. working with terraform and ec2
- creating instances using amis
- running bootstrap script to configure instance as webserver
- configure security groups (ingress/egress on ports 80 & 443)
- assign security groups to ec2 instances
- capture public/private ips of instances as output
to do:
1. configure this static side in hugo
2. set up s3 bucket for static hosting in aws and use terraform to manage this process
3. automate deployments to your website using codeship
_- https://rollout.io/blog/automate-your-hugo-site-with-codeship-and-terraform/_
04/13/20
1. studying terraform, infrastructure as code core concepts
2. created a vpc in aws using terraform
3. learning about terraform init, terraform apply, terraform apply, terraform destroy
4. understanding .tfstate files and how to show state of current environment (terraform state show/terraform state list)
5. learning about variables and output to capture attributes
to do:
1. configure this static site in Hugo, set up terraform to manage my simple infrastructure
04/08/20
1. continuing to study ha architecture (acloudguru)
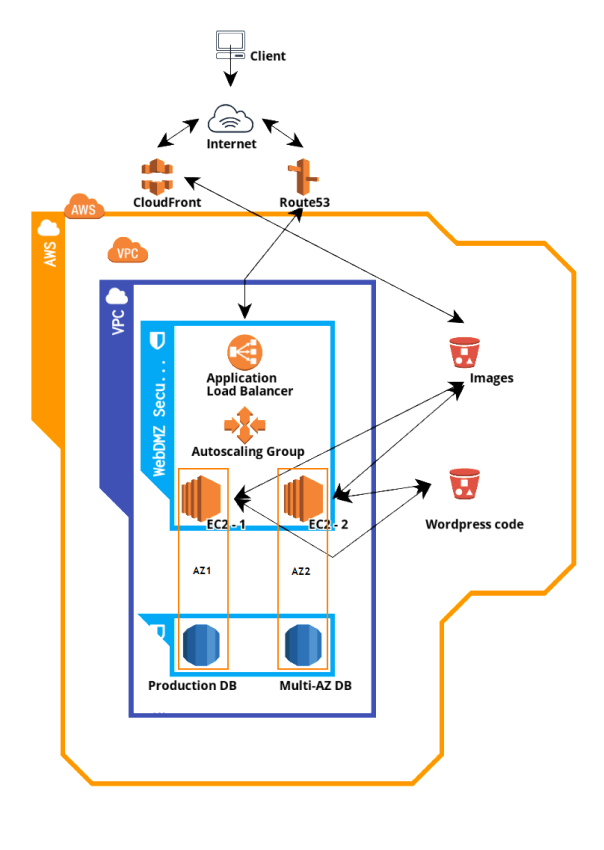
2. created a simple architecture diagram of my fault tolerant wordpress site using app.cloudcraft.co
 04/07/20
1. studying high availability architecture (acloudguru)
2. building a fault tolerant wordpress site - blog.ericfuerstenberg.com
3. first, create ec2 instance, and rds instance, two s3 buckets (one for code, one for static images), and a cloudfront distribution to serve static images more quickly to clients
4. write a quick bootstrap script to:
- install httpd (apache), php, php-mysql to get ec2 instance up an running
- download wordpress, unzip, install, and configure permissions on the directory
5. start wordpress and configure it to point to our rds database.
6. created an initial blog post (http://blog.ericfuerstenberg.com/index.php/2020/04/07/cloud-engineering/), uploaded a couple pictures, and saved the post
7. backed up the files on the ec2 instance in /var/www/html/wp-content to my s3 bucket dedicated to images and also backed up the entire /var/www/html directory to my s3 bucket dedicated to code
8. set up an application load balancer in ec2, using a simple health check against a /healthy.html file, created a target group of instances and assigned them to the load balancer.
9. finally, created a new record set in route 53 to point blog.ericfuerstenberg.com at the application load balancer to get DNS fully set up for the new website.
10. setting up a writer node and reader nodes
11. i configured a single writer node that will push all changes made to S3.
- yhis allows me to have an instance that polls our s3 bucket looking for changes and pulls the changes down to our reader nodes.
- route 53 will send traffic to the reader nodes only.
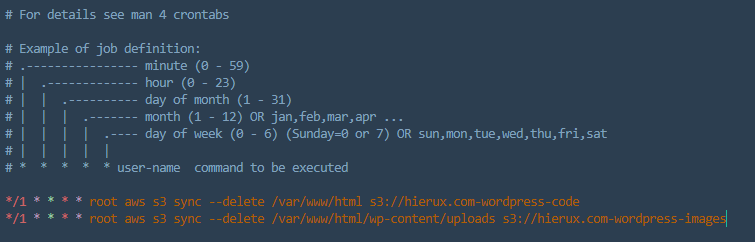
12. to configure the reader nodes, set up a crontab to scan s3 every minute and download any changes to the instance
- (*/1 * * * * root aws s3 sync –delete s3://ericfuerstenberg.com-wordpress-code /var/www/htnl).
- this will sync our reader node with the remote s3 bucket and delete all content on the reader node that is no present in the s3 bucket.
- basically it ensures consistency with the remote s3 bucket.
13. then, I created an AMI of the current state of the reader node
- this will we our reference image for all future reader nodes.
14. I then assigned this AMI to an autoscaling group in ec2 so that I can build out the remaining fleet of reader nodes automatically.
15. finally, re-purpose your previous single instance into a writer node by configuring crontab to sync both s3 buckets (code & images) with content that is on the writer node.
- I’ll use the writer node to make changes to the wordpress side (blog.ericfuerstenberg.com/wp-admin) and push changes to s3
- the reader nodes will pull down and serve this content to any users
 )
)
04/05/20
1. learning and practicing setting up VPCs in AWS
2. set up a custom VPC in AWS with a private and public subnet, configured routing tables, NACLs, and set up a NAT Gateway to allow instances in the private subnet to talk out to the internet
3. set up a bastion host to allow ssh access into private subnet
4. configured a VPC endpoint to S3 (Gateway Endpoint) to allow db server in private subnet to talk directly to AWS S3 without leaving Amazon’s network - this does not require traffic out of our internet gateway
04/04/20
I’m starting this project back up! Looking to practice hosting content in AWS and modifying my enviornment, learning various cloud engineering tools, etc.
My goal is to build on my fundamentals in these key domains:
- AWS (Solutions Architect course - acloudguru)
- Python
- Config management tools (Salt/Chef/Ansible)
- Infra management tools (Cloudformation/Terraform)
- CI/CD (Jenkins)
Today, I’ve accomplished:
1. set up WSL (Windows Sybsystem for Linux) and hyper terminal to work in linux on windows 10, modified config files and set up my preferences.
2. created a new git repo aws-tooling to house my aws cli scripts
3. configured AWS CLI, created users, and assigned policies via CLI
4. created two simple bash scripts. One to list all users in an AWS accout line by line. Another to provide a pretty output of all groups that a given user belongs to.
5. registered this domain (ericfuerstenberg.com) in Route53 and created a created a record set to point to the EC2 instance I also created.
6. spun up an EC2 instance (cloud1), installed nginx, pulled my old ericfuerstenberg.com git repo down, and re-launched this static website to track my notes.
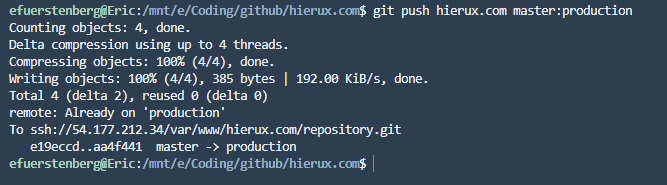
7. set up an empty git repo on my production server with a simple git hook so that I can deploy directly to my website from my local repo. This should improve my development flow. I can push changes directly to my webserver and they will be deployed immediately without needing to ssh to my production server and ‘git pull’
- see: https://peteris.rocks/blog/deploy-your-website-with-git/
 8. the next phase of this would be to set up a proper CI/CD pipeline in Jenkins.
9. also, I should spin up a new EC2 instance as my STAGING instance, push changes to this STAGING server, validate, and then finally deploy to PRODUCTION.
Previous work below:
10/25/18
1. create new ec2 instance
2. set up security group to allow HTTP/HTTPS, SSH, ICMP, etc
3. create new user, add sudo access, set up ssh key
4. configure DNS, set A record for new IP
5. set hostname, /etc/hosts on new instance
6. system update, install whatever other tools you need
7. install nginx (https://docs.nginx.com/nginx/admin-guide/installing-nginx/installing-nginx-open-source/#installing-a-prebuilt-package)
8. configure nginx ( https://www.linode.com/docs/web-servers/nginx/nginx-installation-and-basic-setup/)
-website stuff lives in /var/www/ericfuerstenberg.tech/
-nginx general config lives in /etc/nginx/nginx.conf/ericfuerstenberg.tech.conf
Congrats! You have deployed a shitty static website! Now dockerize it.
10/27/18
1. set up git repo for website
2. push current files and use this for version control
3. familiarizing myself with standard git flow
4. set up ssh key for passwordless push to github
10/28/18
1. creating a TEST PAGE to link to
10/30/18
1. fiddling around with docker (https://docker-curriculum.com/)
2. installed on macbook, “Hello World”
3. docker pull commands and container basics

11/1/18
1. pulled nginx docker image and configured container to launch using local www files on ec2 instance
2. shut down nginx running locally on ec2 instance
3. launch nginx docker container on http port 80, map to port 80 on ec2 instance
- $ docker container run –name dev.ericfuerstenberg.tech -v /var/www/ericfuerstenberg.tech/dev:/usr/share/nginx/html:ro -p80:80 -d nginx
4. shifting gears to learn more about git
5. setting up new dev-branch
6. playing around with pull requests and merging. Set up environment so I have production code living in /var/www/ericfuerstenberg.tech/dev and a development space in ~/webdev/ericfuerstenberg.tech/dev. I am making changes in development space and pushing to master, then pulling to production space. Trying to emulate standard dev/prod workflow.
11/3/18
1. working on setting up elastic IP for server in AWS (54.219.207.176), attach it to the running ec2 instance
2. rename dev.heirux.tech to learn.ericfuerstenberg.tech, create new A record with dns provider
3. update hostname and /etc/hosts/ on server
4. change local directory structure to reflect name change (/var/www/ericfuerstenberg.tech/dev to /var/www/ericfuerstenberg.tech/learn and ~/webdev/ericfuerstenberg.tech/dev to ~/webdev/ericfuerstenberg.tech/learn), push these changes to git, merge with master to change directory names in production
5. change tags on ec2 instance to reflect name change
6. set up staging on learn.ericfuerstenberg.tech:8080 so I can test my changes before pushing to production.
7. launch a new container with port 80 mapped to 8080 on ec2 instance (docker container run –name staging -v /home/ericfuerstenberg/webdev/ericfuerstenberg.tech/learn:/usr/share/nginx/html:ro -p8080:80 -d nginx).
8. add new inbound rule to security group for ec2 instance to allow TCP on port 8080. view staging at learn.ericfuerstenberg.tech:8080
TO DO:
- set up an enabled service using systemd to automatically launch docker container on instance reboot
- work on docker some more, figure out how to set up a “full stack” django app using docker (http://docker.atbaker.me/exercises/exercise_3.html), as this will be good practice if I want to migrate the ICC over to docker later on at work
- reformat website into proper HTML, possibly using CSS, index.html file is starting to get unwieldy
- look into the “autopush to master” feature for github? there should be a way to automate pushing to production instead of having to git pull origin master every time, right?
- also, is this the proper way to merge changes back to master? look into github feature branch best practices. this is keeping the dev-branch alive the entire time